DIY Floating Shelves That Actually Hold Books — In One Weekend
A no-fuss tutorial with the exact hardware list and the mistake most tutorials skip.
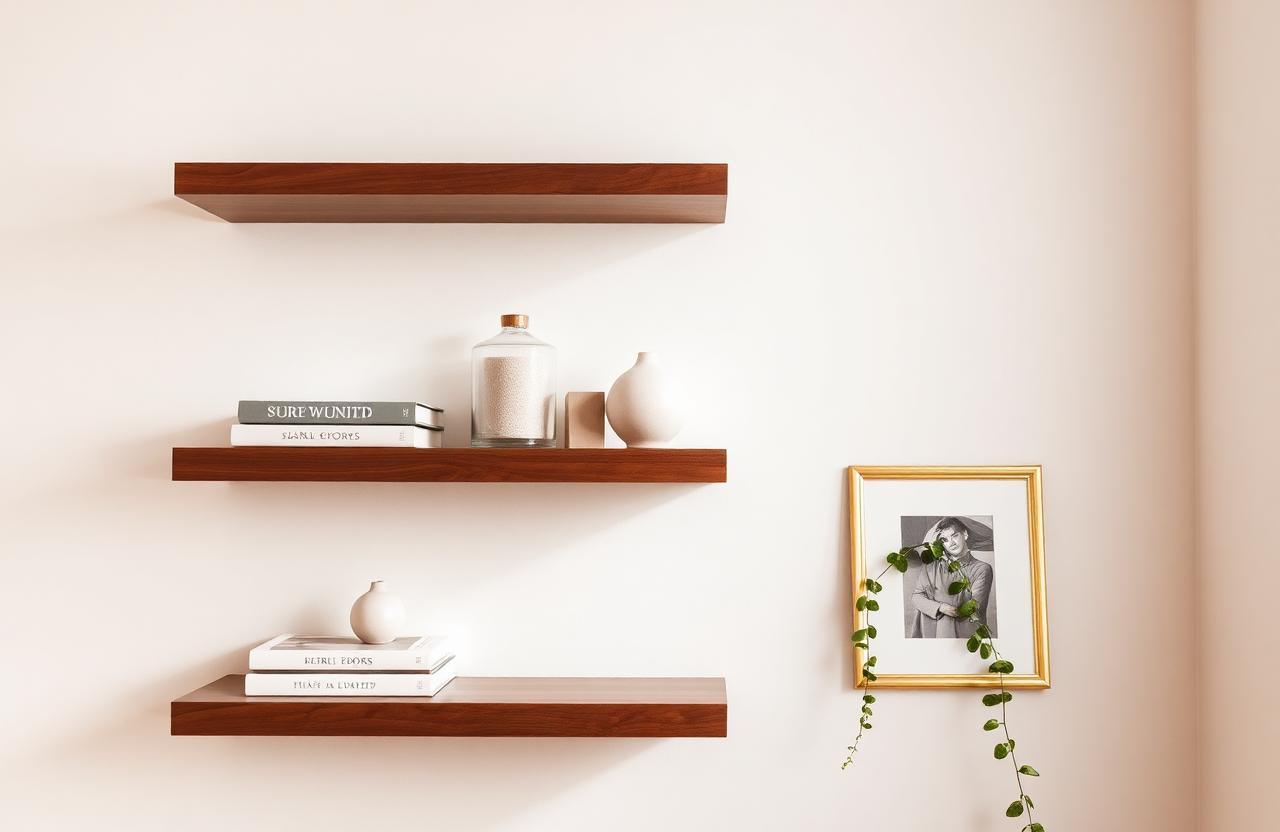
I built my first set of floating shelves six years ago because I could not afford the ones I saw in a catalog. They cost eighteen dollars in lumber, lasted three apartments, and taught me that most DIY tutorials skip the one detail that matters: how to make the shelf actually hold weight. If you have ever installed floating shelves only to watch them sag under a row of paperbacks, this is the guide I wish someone had given me. We are going to build three walnut-stained shelves in a single weekend, and they will actually hold books. Real books. Hardcovers. Let's go.
Why most floating shelves fail
The problem with most floating shelf tutorials — and most off-the-shelf floating shelf kits — is that they rely on drywall anchors alone. Drywall anchors are fine for light duty: a framed photo, a small plant, a candle. They are not fine for a row of books, a stack of ceramic bowls, or that heavy vintage clock you bought at the flea market. The solution is studs. If you anchor your shelf bracket into at least one wall stud, the shelf becomes load-bearing instead of decorative.
The second reason shelves fail is cheap brackets. The concealed metal bracket inside a floating shelf needs to be thick enough to resist bending under load. Thin, flimsy brackets — the kind that come with budget kits — will bow over time. You will see the shelf slowly tilt forward, and one morning you will wake up to a pile of books on the floor. Ask me how I know.
This tutorial uses heavy-gauge steel floating shelf brackets and assumes you will find at least one stud for each shelf. If your wall situation is complicated — plaster, metal studs, concrete — the same principles apply, but you will need different fasteners. We will talk about that at the end.
What you will need
This materials list is for three shelves, each 36 inches long by 8 inches deep. You can scale up or down as needed, but keep the proportions similar. Longer shelves need thicker wood and more brackets to avoid sag.
- ✓Three 1x10 boards (actual 9.25 inches deep), 36 inches long — select pine or poplar
- ✓Six heavy-duty floating shelf brackets (steel, 6 or 8 inches long)
- ✓Wood stain in your preferred color (I used Early American)
- ✓Polyurethane or wax finish
- ✓Stud finder
- ✓Level (at least 24 inches)
- ✓Drill and bits (including a long spade bit for the bracket channel)
- ✓Wood screws (3 inch for studs, plus drywall anchors for non-stud locations)
- ✓Sandpaper (120 and 220 grit)
Total cost for all materials: about seventy-five dollars if you already own a drill and basic tools. You can reuse the stain, finish, and sandpaper for future projects, so the per-shelf cost drops with each build.
Step-by-step build process
- 1
Cut and sand
Have the lumber yard cut your boards to length, or cut them yourself with a miter saw. Sand each board starting with 120-grit, then finishing with 220. Round the front edges slightly with sandpaper for a softer look. Wipe clean with a tack cloth.
- 2
Stain and seal
Apply stain with a rag, wiping in the direction of the grain. Let it dry for 24 hours. Apply a thin coat of polyurethane or paste wax to protect the finish. Let that cure for another 24 hours. Do this step a day before you plan to install.
- 3
Find your studs
Use a stud finder to locate studs on your wall. Mark them with painter's tape. For each shelf, you want at least one bracket anchored into a stud. Ideally two. Mark the bracket positions level using a long level or a laser level.
- 4
Drill bracket channels
Each bracket needs a channel drilled into the back edge of the shelf board. Use a spade bit the same diameter as the bracket rod, drilling straight in about 5 inches. Keep the bit level. Test fit each bracket before moving on.
- 5
Mount the brackets
Hold each bracket against the wall at your marked position. Drill pilot holes, then drive 3-inch screws into the studs. For non-stud locations, use heavy-duty drywall anchors rated for at least 50 pounds. Check that each bracket is level.
- 6
Slide on the shelves
Slide each shelf board onto its brackets. The fit should be snug. If the shelf wobbles, the bracket channel is too loose — add a dab of construction adhesive for a tighter fit. Step back and admire.
The mistake most tutorials skip
Here is the detail nobody mentions: the bracket channel needs to be drilled level. If the channel angles up or down even slightly, the shelf will sit crooked no matter how level your brackets are. Use a drill guide or clamp a scrap piece of wood to the back of the shelf to keep your spade bit perfectly horizontal. It takes an extra thirty seconds and saves an hour of frustration later.
Styling shelves without making them look cluttered
Now that your shelves are up, resist the urge to fill every inch. The best-looking floating shelves have breathing room. Stack books horizontally instead of lining them up vertically. Add one or two objects per stack — a small plant, a ceramic vase, a framed photo leaning against the wall. Leave at least a third of the shelf surface empty.
A good rule: odd numbers. Three objects look better than four. One tall item balances two short ones. Mix textures — a glossy vase next to a matte pot next to a woven basket. And give everything some height variation. The eye likes movement, not uniformity.
"The best-looking floating shelves have breathing room. Leave at least a third of the surface empty."
— Jordan Reyes
Frequently asked questions
How much weight can these shelves hold?
Mounted into studs with heavy-duty brackets, each shelf can hold 40 to 60 pounds easily — enough for a full row of hardcover books. If you are only using drywall anchors, drop that to 20 pounds max and skip heavy items.
Can I do this in a rental?
Yes, but you will leave screw holes in the wall. Drywall holes are easy to patch — just fill with spackle, sand smooth, and touch up with paint. Most landlords consider this normal wear. If you are nervous, ask first.
What if I can't find a stud?
Use toggle bolts or heavy-duty drywall anchors rated for at least 50 pounds. You will still want two anchors per bracket, and you should limit what you put on the shelf. No cast iron bookends.
How do I get the stain color even?
Use a pre-stain wood conditioner on pine or poplar. It prevents blotchy absorption. Wipe on the stain with the grain, then wipe off excess quickly. Two thin coats are better than one thick coat.
What's the best finish for durability?
Water-based polyurethane is easy to apply and dries fast. Paste wax looks more natural but needs occasional reapplication. For shelves that will hold books and decor, either works fine.
Final thoughts
Building your own floating shelves is one of the most satisfying beginner DIY projects because the result is immediately useful and looks genuinely impressive. No one needs to know how simple the build actually was. Once you finish these three shelves, you will probably start seeing spots for more — above the desk, in the entryway, flanking the window. That is the DIY bug setting in. Lean into it. You have the skills now. Go make something else.
Pin this for later
Save this guide to your Pinterest board so it's there when the weekend hits.
📌 Pin it on PinterestWas this helpful?

Jordan Reyes
DIY Projects Editor
Jordan runs the DIY desk at HomeBliss. A self-taught woodworker and longtime renter, he's spent the last decade figuring out which projects are actually worth doing and which ones cost more than just buying the thing. He writes tutorials the way he wishes someone had written them for him at twenty-three.
Related articles
DIY Upholstered Headboard in One Weekend (No Sewing)
A staple gun, a sheet of plywood, and the linen drop cloth secret designers love.
Jordan Reyes·11 min read
Plant Shelf DIY: The Renter-Safe Version That Holds 12 Pots
Tension rod, two brackets, zero drilling — and a plant care cheat sheet for low-light corners.
Jordan Reyes·9 min read
Thrifted Coffee Table Makeover: From Yellow Oak to Warm Walnut
The gel stain method, the finishing oil, and the $12 thrift find that became my favorite piece.
Jordan Reyes·10 min read